Showing posts with label Reconnaissance. Show all posts

Friday, October 18, 2019

How to clone a site with Httrack

welcome to hacking a rise here another post this time on cloning website

What is httrack

HTTrack is a free and open-source Web crawler and offline browser, developed by Xavier Roche and licensed under the GNU General Public License Version 3. HTTrack allows users to download World Wide Web sites from the Internet to a local computer.
find out more here :


How to install Httrack

(If you are using parrot or kali this already installed on the system )

To install HTTrack in linux by using terminal you have to follow this step.

First, open your terminal from search bar ‘Terminal’ or from keyboard CTRL+ALT+T.

To install type or copy the following command and press Enter button.

sudo apt-get install httrack
sudo yum install httrack

To complete installation you have to punch your linux password and then enter to permit. In installation, you will be asked to install this program and you have to press ‘Y’ from your keyboard.
As i am using kali i dont need to install.


How to use Httrack

Right lads open terminal and type httrack --help
Hacking A Rise httrackhelp-1024x624

now we wanna type httrack -O name of the site i be using a site i mead for shorting links you can find it here
https://hackingariseofficial.github.io/
so my command is httrack https://hackingariseofficial.github.io -O hackingarise

Hacking A Rise clone-the-site-here-1024x177

now if we go to are root dir we will see the site
Hacking A Rise sitefile
Hacking A Rise sitefile2-1024x373
Hacking A Rise sitefiles3

from here we can add the beef-xss hook to the index.html we can also test the site and see what vulnerabilities are in the site or we can edited it and make it are own but mostly we use them for phishing


final thoughts on Httrack

well i love this tools its how i clone sites as it gave’s u the full site not just a index.html file like wget dose as we all its simple to use like one simple command and boom its cloned the site not many site copyers can do that so lads and gals i advice you to make this your best friend


Disclamer

This article is only for an Educational purpose. Any actions and or activities related to the material contained within this Website is solely your responsibility. The misuse of the information in this website can result in criminal charges brought against the persons in question. The Authors and https://hackingarise.com will not be held responsible in the event any criminal charges be brought against any individuals misusing the information in this website to break the law

Friday, August 16, 2019

The 99 website scanner

welcome back to hacking a rise people i am him the one and only laughing man so i was on Facebook see lot noobs out there saying they dont know how to use a simple web scanner so i mead a script last nyt about 3 am called The99 named it after Brooklyn 99 lol yes i know kinda funny show about cops haha fuck them im using golismero

What is golismero

GoLismero is an open source framework for security testing. It’s currently geared towards web security, but it can easily be expanded to other kinds of scans.

The most interesting features of the framework are:

Real platform independence. Tested on Windows, Linux, *BSD and OS X.
No native library dependencies. All of the framework has been written in pure Python.
Good performance when compared with other frameworks written in Python and other scripting languages.
Very easy to use.
Plugin development is extremely simple.
The framework also collects and unifies the results of well known tools: sqlmap, xsser, openvas, dnsrecon, theharvester
Integration with standards: CWE, CVE and OWASP.
Designed for cluster deployment in mind (not available yet).
Find out more

What is the 99

Well lads the 99 is a bash script mead by me to speed up scanning websites wile pentesting it more for the noobs that can understand the tools and how to scan sites

Installing The 99

Lads install the 99 is easy start with open terminal and git clone
git clone https://github.com/Hackingariseofficial/The99.git
Hacking A Rise the99clone-300x138
now change the dir to the 99
cd The99
Hacking A Rise dcthe99-300x87
now we gave it promissions
chmod +x the99.sh
Hacking A Rise chmodxthe99-300x15
that’s it lads simple

using The 99

so lads using the The99 is so easy start with typing
./the99.sh
add the url u wanna scan and with the 99
Hacking A Rise useagethe99-300x271

Friday, July 26, 2019

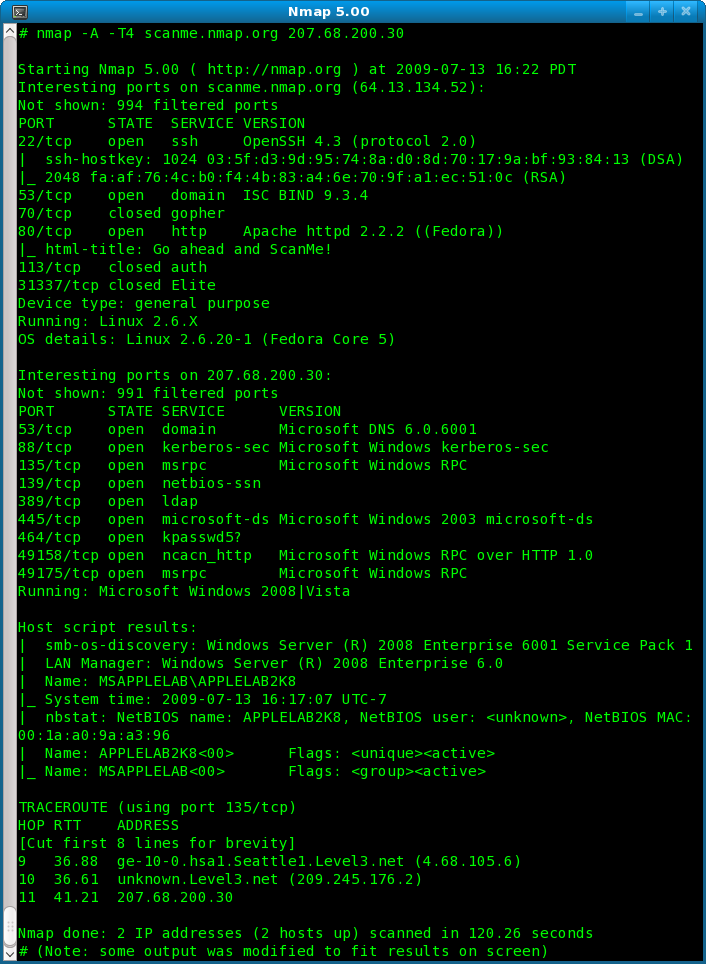
How to use Nmap for network scanning

Hello, this is IRISnoir from Hackingarise. Bringing to you another tutorial.

Today we will be discussing about one of the most essential steps in hacking: Scanning, and it’s representative, Nmap.

Hacking A Rise nmap5-samplescan-706x964

Now, hacking has 5 phases:
– Reconnaissance
– Scanning
– Gaining access
– Maintaining access
– Covering tracks
We will focus on the scanning phase.

Scanning refers to the technique used by hackers to uncover vulnerabilities in a system. Once a flaw is detected, the hacker can proceed to use it to their advantage to compromise a system.

Let’s take a real-life scenario as an example.
You are a burglar, and you wish to rob someone. But you need info about them and their security level. This is the part where you scan them. You look out for places that you can enter safely and quickly into and out of their house, also have an eye out for dogs, security cameras, etc.. In order not to alert the owner in any way as you break in.
DISCLAIMER: Don’t take this as advice for breaking and stealing as it is illegal and can land you in jail.

Now, you get the gist of how it works, we go to the tool and it’s usage.

Brief description of it’s usage:
The tool’s name is Nmap, as you can see in the title. It is a network mapper which enables you to map your whole network or an IP or domain. This includes finding open ports, looking for vulnerabilities, scanning your network, etc..

Now you will want to open the help menu:
nmap -h
Don’t worry, it’s not as hard as you would think. In fact, it’s really easy.

Let’s try to perform those network scans.

The network scan:
First you want to connect to your network by accessing a Wifi.
Then use:
ifconfig
Then go to the wlan0 section, find your IP address. And remember this part: 192.168.X.X
Now fill in this command:
nmap 192.168.X.0/24
Replace the “X” in the IP with the value I told you to remember.
It will proceed to sweep the network for any online hosts, then find port. You can fill in extra commands to make it stronger and scan better and more. Don’t worry, it’s only hard if you make it seem so.

The firewall evading scan technique:
Usually, hosts have firewalls to keep their ports to themselves. Even though that is the case, they do need to filter all kinds of packets. And you only need one single flaw to be discovered.

Firewall filtered ports will appear as “filtered” in the scan report. You need to select the right packet type to do the job. The packets range from TCP SYN (-sS), Connect()(-sT) to FIN(-sF), TCP Null(-sN) and more. The advanced packets do need root to work though. You can use:
tsudo nmap -sF 192.168.X.0/24
For example, it scans the network via FIN packets so as to dodge firewall. If it succeeds, hooray. If it fails, try another packet type. If all fails, then sad for you.

You can learn all about Nmap at its homepage.

I hope you enjoy this tutorial. If you like, please share with your friend. And remember, stay ethical as we aren’t responsible for any of your malicious acts. Thank you and goodbye.

Wednesday, July 24, 2019

Whatweb web app vulnerability Scanner 0.4.9

welcome to hacking a rise in this post i will show u how to use whatweb a simple vulnerability scanner pre installed on kali linux

What is Whatsweb

WhatWeb is a next generation web scanner. WhatWeb recognises web technologies including content management systems (CMS), blogging platforms, statistic/analytics packages, JavaScript libraries, web servers, and embedded devices. WhatWeb has over 1000 plugins, each to recognise something different. Find more here

Whatweb can identify all sorts of information about a live website, like:

Platform
CMS platform
Type of Script
Google Analytics
Web server Platform
IP address, Country
900+ Plugins & their libraries used
Server Headers, Cookies and a lot more.

Whatweb offers both passive scanning and aggressive testing. Passive scanning just extracts data from HTTP headers simulating a normal visit. Aggressive options get deeper with recursion & various types of queries & identify all technologies just like a vulnerability scanner.
Options

Syntax of whatweb

Options is deprecated. Only major options or listed. Visit tool homepage for complete options

TARGET SELECTION:
Enter URLs, filenames or nmap-format IP ranges.
–input-file=FILE, -i Identify URLs found in FILE, eg. -i /dev/stdin

TARGET MODIFICATION:
–url-prefix Add a prefix to target URLs
–url-suffix Add a suffix to target URLs
–url-pattern Insert the targets into a URL. Requires –input-file,

AGGRESSION:
The aggression level controls the trade-off between speed/stealth and reliability.
–aggression, -a=LEVEL Set the aggression level. Default: 1
Aggression levels are: 1,2,3 & 4

HTTP OPTIONS:
–user-agent, -U=AGENT Identify as AGENT instead of WhatWeb/0.4.8-dev.
–follow-redirect=WHEN Control when to follow redirects.Default: always
–max-redirects=NUM Maximum number of contiguous redirects. Default: 10

AUTHENTICATION:
–user, -u= HTTP basic authentication
Add session cookies with –header, e.g. –header “Cookie: SESSID=1a2b3c;”

PROXY:
–proxy Set proxy hostname and port Default: 8080
–proxy-user Set proxy user and password

PLUGINS:
–list-plugins, -l List all plugins

OUTPUT:
–verbose, -v Verbose output includes plugin descriptions. Use twice for debugging.
–colour,–color=WHEN control whether colour is used. WHEN=’always’, ‘never’ or ‘auto’
–quiet, -q Do not display brief logging to STDOUT
–no-errors Suppress error messages

LOGGING:
–log-brief=FILE Log brief, one-line output
–log-verbose=FILE Log verbose output
–log-xml=FILE Log XML format

PERFORMANCE & STABILITY:
–max-threads, -t Number of simultaneous threads. Default: 25.
–open-timeout Time in seconds. Default: 15
–read-timeout Time in seconds. Default: 30
–wait=SECONDS Wait SECONDS between connections

HELP & MISCELLANEOUS:
–help, -h This help
–debug Raise errors in plugins
–version Display version information. (WhatWeb 0.4.8-dev)

How to use Whatsweb

open terminal and type whatweb https://hackingarise20.home.blog/
Hacking A Rise whatwebscan1-300x43

what see a little more detail use the -v Display version information whatweb -v https://hackingarise20.home.blog
Hacking A Rise whatwebscan2-153x300

There ya have it lads nice and easy see when using what web it automatic use all the plug ins for this scanner to work to see the plug ins type whatweb -l
WhatWeb Plugin List

Plugin Name – Description
——————————————————————————–

Tuesday, July 16, 2019

Sherlock social meadia username search

Welcome to hacking a rise in this one we are going to show you how to install and use Sherlock python tool for searching social media as alway i am the laughing man the reason im writing this post as a member blitiz was asking about it anyways lets get bet in lads and gals

What is sherlock

Sherlock, a powerful command line tool provided by Sherlock Project, can be used to find usernames across many social networks. It requires Python 3.6 or higher and works on MacOS, Linux and Windows. find out more here

Install sherlock

open terminal and type git clone https://github.com/sherlock-project/sherlock.git
cd sherlock
pip3 install -r requirements.txt

Hacking A Rise sherlockgit-300x89
Hacking A Rise sherlockinstall-229x300

now to run the script with python3 sherlock.py
Hacking A Rise sherlockrun-300x111

now to search for a username type python3 sherlock.py Thelaughingman
Hacking A Rise sherlocksearch-214x300

and yes it saves all the urls in a nice neat txt file
Hacking A Rise sherlocktext-300x214

final thoughts

its a nice little tool for people for a base line search and with basic info on target like the username of accounts

snoopy online username search

Welcome to hacking a rise today we going to show to you snoopy the online username search tool and as always im the laughingman lets start like we always do with the tool is

What is snoopy

Snoopy is a tool mead in bash by laughingman what is dose it looks for usernames on load of sites it offers a location option in ya wanna try and narrow the search for the target now i make this clear the search is based on the info you gave but with more updates i be adding a load more features like city phone number search as well as email till then we stick with usernames lol right to the install

Install Snoopy

first open terminal and type git clone https://github.com/Hackingariseofficial/snoopy.git
then cd snoopy then ls
then chmod +x snoopy.sh
Hacking A Rise snoopy-300x172

termux users install
pkg install git
git clone https://github.com/Hackingariseofficial/snoopy.git
cd snoopy
chmod +x snoopy.sh

How to use snoopy

the use of snoopy is basic just type ./snoopy.sh
Hacking A Rise snoopystart-206x300

it will then ask for a name and a location so enter the username and location or just username and press enter
Hacking A Rise snoopyinput-300x45

now we let it run
Hacking A Rise snoopyresults-212x300

when its done it will make a txt file with the targets name on it as you see im search for the laughingman
Hacking A Rise snoopyfiles-300x68

the txt file contains the links found to that username
Hacking A Rise snoopytxtlinks-300x210

Final thoughts on snoopy

as i mead this out pure boredom and to see it it grow i was meant for just youtube,facebook etc.. then i keep adding sites like the new updates is snapchat and ps network username search as well as few other sites the main goal was for people to have a baseline for recon on a target

Saturday, July 13, 2019

How to use Ghost_eye

welcome to hacking a rise in this post we are going to show you how to use this magnificent tool ghost eye by Jolanda de Koff BullsEye0 so lets get bet in to the tool

what is Ghost eye

Ghost Eye – Information Gathering Tool

Ghost Eye is an Information Gathering Tool I made in python 3. To run Ghost Eye, it only needs a domain or ip. Ghost Eye can work with any Linux distros if they support Python 3.

Ghost Eye gathers information data such as:
Whois Lookup
DNS Lookup
EtherApe
Nmap Port Scan
HTTP Header Grabber
Clickjacking Test
Robots.txt Scanner
Link Grabber
IP Location Finder
Traceroute
Have I been pwned
Exit

More in found at jolanda de koff github here

or check out her YouTube

Installing Ghost eye

open terminal and type apt install nmap etherape
Hacking A Rise installnmapetterape-217x300

now we clone the tool to are home dir so type in terminal git clone https://github.com/BullsEye0/ghost_eye.git and change the dir ghost eye so type cd ghost_eye then ls
Hacking A Rise gitcloneghosteye-300x112

now we type pip3 install -r requirements.txt
Hacking A Rise pip3ghosteye-300x264

now we are done

Using Ghost eye

Now we have it installed and the requirements install we can now run the tool so type python3 ghost_eye.py

Hacking A Rise runghosteye-232x300

now u can see the menu there
Hacking A Rise menughost_eye-300x153

so lets start with a whois scan press 1 and enter then enter the domain

Hacking A Rise whoisghosteye-300x114

so now press 2 for dns
Hacking A Rise 2ghosteye-300x184
Hacking A Rise Screenshot-from-2019-07-13-00-34-51-300x15

Disclamer

Hackingarise does not take responsibility for any actions you may perform with this tool and/or knowledge!! Your actions are your choices so please make wise ones!! Hackingarise makes these tutorials for educational purposes only and they are used to teach the public how hackers can use tools to break into their devices!!

Final Thoughts

So lads nice little tool aint it handy for those that dont understand how to perform passive recon on a URL/domain to keep up to date with Jolanda de Koff like her Facebook page thank you for reading lads see you in the next one laughingman

Thursday, July 11, 2019

Shodan hackers search engine

Welcome to hacking a rise im the laughingman this post a little different in this one we talk a little about shodan ( the hackers search engine )

What is Shodan

Shodan is a search engine that lets the user find specific types of computers (webcams, routers, servers, etc.) connected to the internet using a variety of filters. Some have also described it as a search engine of service banners, which are metadata that the server sends back to the client.[1] This can be information about the server software, what options the service supports, a welcome message or anything else that the client can find out before interacting with the server.
Shodan collects data mostly on web servers (HTTP/HTTPS – port 80, 8080, 443, 8443), as well as FTP (port 21), SSH (port 22), Telnet (port 23), SNMP (port 161), IMAP (ports 143, or (encrypted) 993), SMTP (port 25), SIP (port 5060), and Real Time Streaming Protocol (RTSP, port 554). The latter can be used to access webcams and their video stream.
It was launched in 2009 by computer programmer John Matherly, who, in 2003, conceived the idea of searching devices linked to the Internet. The name Shodan is a reference to SHODAN, a character from the System Shock video game series.

How to use Shodan

so lads u dont need linux or anything fancy to use shodan its a website shodan.io so frist of all im going to need you to sign up to shodan before we can use it so u go a head and sign up

Now we signed up and signed in we are greeted with the home page
Hacking A Rise shodanhomepage-300x210

see the search bar type samsung galaxy s6 in to it
Hacking A Rise search-300x194

one result lol ok lets up the search type smart tv
Hacking A Rise smarttvsearch-300x240
as you can see there is a load of them

we can also look for companys ip and that with shodan lets look for google
Hacking A Rise googlesearch-300x248

as you see there is like 287,573 results lol

so we can filter were we wanna search for like lets as i wanna find the google servers in inda we can click in the side panel
Hacking A Rise sidepanel-300x119

Hacking A Rise Screenshot-from-2019-07-11-16-07-46-300x208

we can search for anything like webcams
Hacking A Rise webcams-300x208

Final Thoughts

wel lads i love shodan back the days i was a black hat i use to use it to fine companys to exploit and webcams stuff like that im my experience if its online it is on shodan lol have a gud one lads and remember happy hacking 🙂

DISCLAIMER

Hackingarise does not take responsibility for any actions you may perform with this tool and/or knowledge!! Your actions are your choices so please make wise ones!! Hackingarise makes these tutorials for educational purposes only and they are used to teach the public how hackers can use tools to break into their devices!!

Wednesday, July 10, 2019

IntRec - Pack Intelligence and Reconnaissance Package/Bundle installer

Welcome to Hacking a rise in this i am going to show you how to install and use IntRec on any Debian system i am using Kali Linux for this tutorial

Whats IntRec

IntRec-Pack is a Bash script designed to download, install and deploy several quality OSINT, Recon and Threat Intelligence tools. Due to the fact it manages the installation of the various dependencies related to these programs as well it aims to be a comprehensive assistant in setting up your intelligence gathering environment. Below is an overview of the tools and utilities it will help you set up.

How to install

git clone https://github.com/NullArray/IntRec-Pack.git
cd IntRec-pack
chmod +x intrec.sh
Hacking A Rise gitclonintrec-300x141

how to use IntRec

Now we can run the script by typeing ./intrec.sh
Hacking A Rise intrec-300x194

now we press 2 list and install this will list all the recon tools you can install with this tool
Hacking A Rise preesss2-300x282

so we have 14 tools to pick from

    1) QuickScan
    2) TadPole
    3) DNSRecon
    4) Sublist3r
    5) TekDefense
    6) TheHarvester
    7) IOC-Parser
    8) PyParser-CVE
    9) Mimir
    10) Harbinger
    11) Inquisitor
    12) BirdWatcher
    13) Spiderfoot
    14) EagleEye

Hacking A Rise 14tools-300x74

so im going to install Spiderfoot a great OSINT scanner so i will put 13 to install Spiderfoot
Hacking A Rise 13-227x300

that it or we can type 15 go back to the main menu and install all the tools but we wont next tool i want to install is Birdwatcher so i type 12
Hacking A Rise 12-279x300

Final thoughts

So lad over all its a nice little package installer for people not running the likes of Kali parrot cyborg etc as well as the tools are pretty useful as iv use them on my other laptop.

Anyways lads gud bye hope ya enjoyed and see you in the next one

Tuesday, July 9, 2019

How to use raccoon-scanner

Introduction

Hello and welcome to another post and in this one we will be going over raccoon-scanner. This is a high performance offensive security tool that is made for recon and vuln scanning, as they explain it. We’ll be going over how to install it and use it + an overview of my experience with it. Lets get into the post!!

Installing raccoon-scanner

So you have to have python3 and pip3 installed on ur system if not just type “apt install python3” and done! So now we go into the terminal and type “pip3 install raccoon-scanner” and your done with installing it!! We can install it through github, here is the method for that –

git clone https://github.com/evyatarmeged/Raccoon.git

cd Raccoon

python setup.py install

Using raccoon-scanner

Coolio, we now have raccoon scanner installed!! So lets look at the commands for this amazing tool by typing “raccoon –help” cool lets have a look –

Hacking A Rise Screenshot_2019-07-10_00-41-34

Woah thats quite a bit, now we’ll run “raccoon –no-sub-enum hackingarise.com” because I don’t wanna brute subdomains yet…lets have a look at the results –

Hacking A Rise Screenshot_2019-07-10_00-51-17

Cool as you can see this scanner pulls allot of info. Lets run “raccoon –no-sub-enum –vulners-nmap-scan hackingarise.com” and see what we get, basically –vulners-nmap-scan just run a different nmap scan to the regular nmap -Pn hackingarise.com so it takes longer. You can also change the flags in nmap with the commands -sc, -sv, -f, -p you can also skip the nmap scan with –skip-nmap-scan

overview of raccoon-scanner

Overall I think is a good recon tool and deffo one to add to the hackers toolbox indeed. Just incase you were wondering what distro I am on, its backbox 6 as I’m doing a project on there lol. Lets have a look at the features of this tool –


  • DNS details
  • DNS visual mapping using DNS dumpster
  • WHOIS information
  • TLS Data – supported ciphers, TLS versions, certificate details and SANs
  • Port Scan
  • Services and scripts scan
  • URL fuzzing and dir/file detection
  • Subdomain enumeration – uses Google dorking, DNS dumpster queries, SAN discovery and bruteforce
  • Web application data retrieval:
    • CMS detection
    • Web server info and X-Powered-By
    • robots.txt and sitemap extraction
    • Cookie inspection
    • Extracts all fuzzable URLs
    • Discovers HTML forms
    • Retrieves all Email addresses
    • Scans target for vulnerable S3 buckets and enumerates them for sensitive files
  • Detects known WAFs
  • Supports anonymous routing through Tor/Proxies
  • Uses asyncio for improved performance
  • Saves output to files – separates targets by folders and modules by files


Now the description of the tool –

Raccoon is a tool made for reconnaissance and information gathering with an emphasis on simplicity.
It will do everything from fetching DNS records, retrieving WHOIS information, obtaining TLS data, detecting WAF presence and up to threaded dir busting and subdomain enumeration. Every scan outputs to a corresponding file.

As most of Raccoon’s scans are independent and do not rely on each other’s results, it utilizes Python’s asyncio to run most scans asynchronously.

Raccoon supports Tor/proxy for anonymous routing. It uses default wordlists (for URL fuzzing and subdomain discovery) from the amazing SecLists repository but different lists can be passed as arguments.

This is all from the github repo you can publicly access here: https://github.com/evyatarmeged/Raccoon

This post has been fun to make and maybe the tool was even better than the post itself, but in the end using this tool was great and shows how easy some hackers can utilize it to gain recon on your website and perform an attack so make sure you keep updated and patched to prevent all those nasty hackers from getting in! Thanks for reading another post, subscribe to our newsletter for more hacker tutorials and check out the other posts! Enjoy your day!!

DISCLAIMER

Hackingarise does not take responsibility for any actions you may perform with this tool and/or knowledge!! Your actions are your choices so please make wise ones!! Hackingarise makes these tutorials for educational purposes only and they are used to teach the public how hackers can use tools to break into their devices!!

Sunday, July 7, 2019

How to use Tshark - the brother of Wireshark

Hello everyone~~

This is IRISnoir from Hackingarise. Bringing to you a tutorial. Let’s get started.

Now, this tutorial’s gonna show you about the usage of Tshark

Hacking A Rise images?q=tbn:ANd9GcT63vAMNP-V6uJ9pCexCvgw0tLEbUBt0S2WzM1QO46sXURdF7zhUg
Now, a little description: Tshark is the brother of Wireshark. But, Tshark is only compatible on terminal mode while Wireshark can only be used in VNC mode (called wireshark-gtk).

Now, Tshark’s installation:
It is located at the root-repo so make sure you have it subscribed with:
$ pkg install root-repo
If done, you can install it with:
$ pkg install tshark

Because Tshark’s in the root-repo, it means it has something to do with rooting your device. So go and root your device if you expect this tool to be helpful.

Now, using it casually without root will just make it turn into a Random packet generator. It means it will generate 1000 packets for your eyes to enjoy. No actual reconnaissance.

But using root will give it an entire different sensation. What you need is a connected Wifi. Then do this:
tsudo tshark -i wlan0 --color
-i will let you specify interface. But we want to sniff the wifi, we use wlan0
--color will make it rainbow colorful like the wireshark so you can distinguish traffic better.

Upon activation, you will get to see the whole traffic of the wifi. Pretty exciting to see and monitor everyone’s action. Makes you the (kinda) boss and if you are nice, you can monitor and watch for hackers like a fellow security.

If you find anything incriminating like ARP requests flooding, DoS/DDoS attempt then you need to report or do something to be safe or protect users in the network.

You can watch the help page, man page to see what you can do. Like increasing verbosity.

I hope that this tutorial will help you. We do NOT encourage you to do malicious acts on innocent people. Hackingarise is NOT responsible for your acts. Thank you very much for reading.

Sunday, June 23, 2019

The harvester

Welcome to hacking a rise hacking a rise I am the Laughingman here with another post this time on getting emails of a domain using harvester this comes in handy for recon so lets get started

What is The Harvester

The objective of this program is to gather emails, subdomains, hosts, employee names, open ports and banners from different public sources like search engines, PGP key servers and SHODAN computer database.

This tool is intended to help Penetration testers in the early stages of the penetration test in order to understand the customer footprint on the Internet. It is also useful for anyone that wants to know what an attacker can see about their organization.

This is a complete rewrite of the tool with new features like:

Time delays between request
All sources search
Virtual host verifier
Active enumeration (DNS enumeration, Reverse lookups, TLD expansion)
Integration with SHODAN computer database, to get the open ports and banners
Save to XML and HTML
Basic graph with stats
New sources
Source: https://github.com/laramies/theHarvester/
theHarvester Homepage | Kali theHarvester Repo

How to use The Harvester

Right lads using this is so simple a 4 year old can do it so open terminal and type theharester
Hacking A Rise theharvester-193x300

so befor i show you how to use the tool let me explain the santax of the command -d is the domain of target -l in the ammount emails u wanna find -b is the search engine you want to use there a few you can use with out api like google,bing,yahoo etc …

so in terminal type thehasrvester -d facebook.com -l 100 -d google
Hacking A Rise emailgoogle-201x300

lets see what yahoo gaves use the same command agen but add yahoo to the -b
Hacking A Rise yahooemail-141x300

so say you want to save your results well we can as a html file or xml im going to save mine as htmland search with google yahoo and bing so type theharvester -d facebook.com -b google,bing,yahoo -l 50 -f facebookemails.html

Hacking A Rise last-search-300x129
Hacking A Rise results-300x170

what thats going to do see search on google,bing,yahoo for any email related to facebook.com and save to ur root dir as a html file you can view it in the browser by clicking
it
Hacking A Rise browser-127x300

Disclamer

hacking a rise dont take responsibility of any there viewers actions as this purely educational .

there you have it lad simple right till the next one laughingman out