welcome back in this post we going to look in to phishing a little more with this tool Credsniper wrote in python 3 this script makes it easy to phish gmail password
easily launch a new phishing site fully presented with SSL and capture credentials along with 2FA tokens using CredSniper. The API provides secure access to the currently captured credentials which can be consumed by other applications using a randomly generated API token.
Brought to you by:
Black Hills Information Security
Benefits
Fully supported SSL via Let’s Encrypt
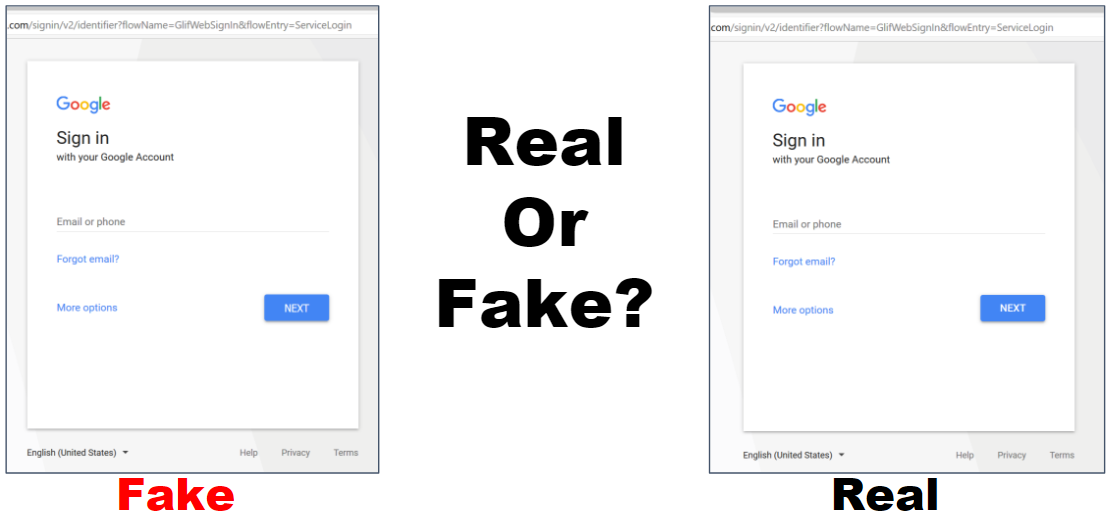
Exact login form clones for realistic phishing
Any number of intermediate pages
(i.e. Gmail login, password and two-factor pages then a redirect)
Supports phishing 2FA tokens
API for integrating credentials into other applications
Easy to personalize using a templating framework
Basic Usage
usage: credsniper.py [-h] –module MODULE [–twofactor] [–port PORT] [–ssl] [–verbose] –final FINAL –hostname HOSTNAME
optional arguments:
-h, –help show this help message and exit
–module MODULE phishing module name – for example, “gmail”
–twofactor enable two-factor phishing
–port PORT listening port (default: 80/443)
–ssl use SSL via Let’s Encrypt
–verbose enable verbose output
–final FINAL final url the user is redirected to after phishing is done
–hostname HOSTNAME hostname for SSL
Credentials
.cache : Temporarily store username/password when phishing 2FA
.sniped : Flat-file storage for captured credentials and other information
API End-point
View Credentials (GET) https:///creds/view?api_token=
Mark Credential as Seen (GET) https:///creds/seen/?api_token=
Update Configuration (POST) https:///config
{
‘enable_2fa’: true,
‘module’: ‘gmail’,
‘api_token’: ‘some-random-string’
}
Modules
All modules can be loaded by passing the –module command to CredSniper. These are loaded from a directory inside /modules. CredSniper is built using Python Flask and all the module HTML templates are rendered using Jinja2.
Gmail: The latest Gmail login cloned and customized to trigger/phish all forms of 2FA
modules/gmail/gmail.py: Main module loaded w/ –module gmail
modules/gmail/templates/error.html: Error page for 404’s
modules/gmail/templates/login.html: Gmail Login Page
modules/gmail/templates/password.html: Gmail Password Page
modules/gmail/templates/authenticator.html: Google Authenticator 2FA page
modules/gmail/templates/sms.html: SMS 2FA page
modules/gmail/templates/touchscreen.html: Phone Prompt 2FA page
GMAIL UPDATE: Google requires a backup form of 2FA when using U2F. Bypassing U2F is possible by forcing one of the fall-back options instead of prompting the user to use their U2F device. CredSniper attempts to force SMS if it’s available otherwise it forces TOTP. For security savvy victims, they may be weary if they are prompted for the SMS or TOTP token instead of their U2F device.
Example: An example module that demonstrates standard phishing w/ 2FA tokens
modules/example/example.py: Main module loaded w/ –module example
modules/example/templates/login.html: Standard login form
modules/example/templates/twofactor.html: Standard 2FA token form
Installation
Ubuntu 16.04
You can install and run automatically with the following command:
$ git clone https://github.com/ustayready/CredSniper
$ cd CredSniper
~/CredSniper$ ./install.sh
Then, to run manually use the following commands:
~/$ cd CredSniper
~/CredSniper$ source bin/activate
(CredSniper) ~/CredSniper$ python credsniper.py –help
Note that Python 3 is required.
credit to ustayready
No comments:
Post a Comment
Note: Only a member of this blog may post a comment.